Using good, clean, and healthy seed
Why use good seed?
Good seed leads to lower seed rate, higher crop emergence (>70%), reduced replanting, more uniform plant stands, and more vigorous early crop growth. Vigorous growth in early stages reduces weed problems and increases crop resistance to insect pests and diseases. A combination of higher crop emergence, vigorous early crop growth, and increased crop resistance to insect pests and diseases will result to a 5−20% increase in yield.
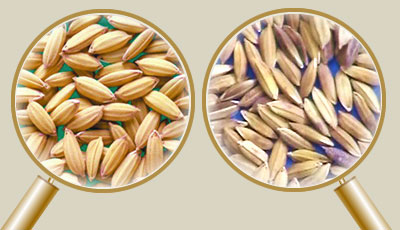 Good quality seeds (left) are uniform in size, full, and plump; while poor quality seeds (right) are often discolored.
What is good seed?
Good seed is pure (of the chosen variety), full and uniform in size, viable (more than 80% germination with good seedling vigor), and free of weed seeds, seed-borne diseases, pathogens, insects or other matter. Seed should be properly labeled.
Obtaining good seed
- Buy certified seed that is pure and labeled,
- get farmer-produced good seed, or
- select your own good seed.
 Winnowing to get good seed:
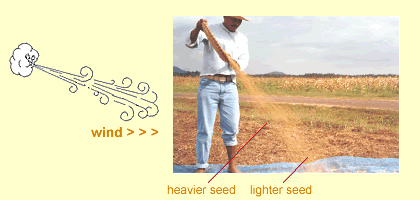
Harvested seed includes seed of varying sizes and non-seed matter (e.g., weeds and trash). Full plump (heavier) seed can be selected by winnowing with natural wind or an electric fan. Procedure: Pour seed slowly from a height of 1-1.5 m.
Repeat winnowing, if necessary. Select heavier seed closer to the side from which the wind blows. This procedure will also remove lighter weed seed and non-seed matter.
Drying and storing good seed
After harvest, clean seed and select full and uniform seed. Dry seed to 12−14% moisture content. Store the seed in sealed airtight containers until ready for planting (seed is good for up to one year if stored properly). Seed in non-airtight containers absorbs moisture and loses viability over time.
Testing seed germination to ensure seed is good
- Select a number of small random samples from the seed to be planted and select a subset (e.g., 200 seeds) of the combined sample. Soak the seed in water for 24 hours.
- Arrange 100 soaked seeds in a grid pattern on a wet paper towel.
- Place the paper in a closed container or
- cover the seeds with another moist paper towel and roll together and place the sample in a plastic bag. - Ensure paper remains moist (but not wet to the point of water running off – or seed will rot).
- Count the germinated seeds three and five days later and record the germination percentage.
- Seed should have at least 80% germination to be considered good.
Testing establishment vs. germination
It is best to also check seed germination in soil, as emergence can often be 70% or less of germination. Place two samples of 100 seeds in a tray filled with soil – cover lightly with soil (e.g., 5 mm), keep moist and count establishment after seven days. Note: Larger seeds tend to establish better then smaller seeds.
Seed treatments (used in some countries)
Seed priming (optional) for direct seeding
Soak seeds in water for 12 to 24 h just before direct seeding in a field. If seeding is delayed, the soaked seeds can be dried in shade and stored until it can be planted that season.
Azospirillum inoculation (for N fixation by rice seedlings)
Use 1 g of Azospirillum sp. inoculant (as a powder) per kg of seed and mix with primed wet seed just before sowing.
Fungicide seed treatment (rarely used in Asia)
- Dissolve 3 g fungicide (e.g., Benlate + Mancozeb or Arazone red alone) per kg seed in 5 ml water inside a plastic bag or plastic bottle.
- Distribute fungicide slurry about the walls of the container.
- Place seed in container, seal, and shake to coat seed uniformly with fungicide slurry.
- Wear protective equipment and follow appropriate safety procedures.
Ten steps for farmers to produce their own good seed
- Select a fertile field.
- Use clean, good quality seed.
- Plow, puddle and level the field well to control weeds and improve water management.
- If transplanting, plant young (15−20 d) seedlings from a healthy, weed-free nursery at 2 per hill at 22.5 cm x 22.5 cm spacing.
- Apply balanced nutrients (Nitrogen, Phosphorus, Potassium, Sulfur, and Zinc) as per crop demand.
- Keep the crop free of weeds, insect pests and diseases.
- At maximum tillering and flowering, rogue off-types (by plant height, appearance, flowering time, etc.) and poor, diseased or insect damaged plants or plants with discolored panicles.
- Harvest at full maturity (80−85% of the grains are straw-colored).
- Thresh, clean, dry (12−14% moisture content), grade and label the harvested seed.
- Store the labeled seed in sealed clean containers in a cool, dry and clean area.